You remember the First Commandment of M3 Reporting, right?
“Thou Shalt Not Run External Reports Against The Production Database” – ReadyERPSolutions.com, Chapter 3 Verse 1
For those of you running M3 on-premise with SQL Server, creating your own mirrored database for reporting purposes is easier than you might think (sorry M3 Cloud users, you’ll have to sit this one out since you don’t get SQL access).
The benefits of setting up a replicated database for reporting purposes are important and straightforward: basically, you avoid the risk of queries slowing down your production database server, which won’t just annoy your users, but could also impact the completion of transactions by the business engine.
I’ve had one client in particular where users gave up on doing anything useful before 10:00 a.m., because overnight reports were still typically running into the morning, slowing down M3 to the point where users couldn’t perform even basic functions.
But let’s get right to the action and show how to set this up…
Setting Up A Mirrored M3 Reporting Database
Note: There’s a document on Infor Xtreme titled “M3 Business Engine and Microsoft SQL Server – Best Practices” which I’d highly recommend reviewing for your combination of M3 and SQL Server version. We worked from the M3 BE 15.1.x/SQL Server 2014 document published in July 2016.
The basic idea here is that we will use SQL Server’s Replication functions to maintain the reporting database. It all starts with a snapshot which is brought over to your reporting server, and after the snapshot is taken transactions are logged and passed over in near real-time (in our experience, almost always less than 5 seconds).
The M3 Production database will be considered a Publisher in SQL Server, while your reporting database is termed a Subscriber. In this example I will create a replica from our TST database to a reporting database called M3TSTRPT.
Step 1: Create the reporting database
This part is real easy – just go into the SQL Server where you want reporting to be performed (NOT YOUR M3 PRODUCTION DATABASE SERVER), and right-click on Databases to create a New Database. Name it however you like (I’m going with M3TSTRPT here) and hit OK.
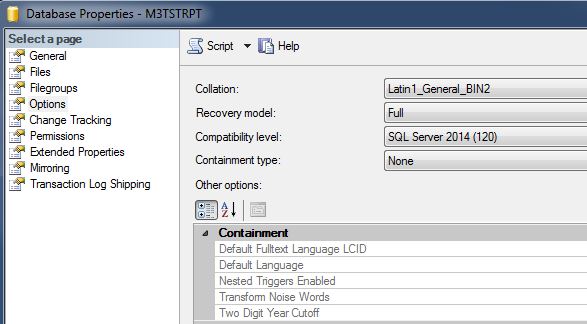
Next, it is important that you set the collation of the reporting database to the same as it is for M3, i.e. Latin1_General_BIN2 in our case. Immediately after creating your database, go into the Properties for it, and look for collation under the Options section. You want to get this set correctly before we start the replication process.
Step 2: Set up the Publisher
Now we need to designate our M3 database as a Publisher. Log into the SQL Server where your M3 database resides, and expand the Replication section. Right-click on Local Publications in order to create a New Publication. This will launch the New Publication Wizard, so let’s walk through those panels together.
- First you are asked to designate a Distributor, which can be a server in the middle between the Publisher and Subscriber, which stores and transmits information. In our case, we allowed our M3 database to act as its own Distributor (the default option).
- Do you want the SQL Server Agent service to start automatically? Yes, yes you do.
- Next you specify the folder where the snapshot should be placed for the Subscriber to pick up. Since the Subscriber is on another server, this needs to be a network shared folder.
- Now we select the database which will publish. Typically this will be M3FDBPRD, but since this example uses a TST environment, I am using M3FDBTST.
- Publication Type: this is a biggie! Here we will select “Transactional Publication”, which operates as described earlier. A snapshot of the database is sent over to start with, and following that, incremental updates are passed along as they occur.
- Articles: here you can select specific Tables and Views to bring over to your reporting database. I highly recommend you choose your tables based on reporting requirements, rather than just click the checkbox for everything, which could potentially cause performance issues. After all, you don’t need data from the various working tables in M3 such as FCR040. If you don’t get all the tables you need in this step, don’t worry! It is easy to add new ones later on (maybe I’ll cover that process in another article here). For this example I’m just going to bring over the user table CMNUSR.
- There is a step where you can filter which rows are brought over in the replication process. If, for example, you had multiple companies in M3 and wanted to set up different reporting databases for each one, you could accomplish that by filtering the records you bring across by CONO. Typically, however, you’ll skip this step.
- Next up, would you like to create a snapshot immediately, or schedule it for a later time? The main reason to schedule it later is if you plan to make changes to the snapshot before flipping the switch for replication (for example, you are waiting to get the final list of Articles you want to import in Step 6).
- Agent Security: The SQL Server Agent will run all these processes, so you need to provide it with a user ID/password that has appropriate authority. In my example, I use a Windows account that has admin authority to the servers and folders in question, and for the “Connection to Publisher” I choose “Impersonate the process account.”
- Next, you have a choice as to whether to create the Publication immediately (usually that’s a yes, unless you don’t have your final list of Articles yet), and whether or not to create a script that follows those same steps (in case you plan on doing this a lot, which I doubt).
- Lastly, give this Publication a name! I’m calling this ReplDemo.
Assuming you told SQL Server to create the Publication immediately in Step 10, you’ll see a pop-up that shows the progress through the various steps of creating the publication and the initial snapshot.
Step 3: Subscribe
Now that we have a Publisher established, we need to tell our reporting database to become a Subscriber. Switch over your SQL Server connection to your reporting database, expand the Replication tab and use a right-click to create a New Subscription.
Once again, you’re led into a Wizard, so here we go:
- Select the Publisher. From the drop-down list, select “Find a SQL Server Publisher”, which then prompts you to log into your M3 database server and browse for the Publication you just set up.
- For the Distribution Agent Location, select the bottom option “Run each agent at its Subscriber”. This reduces the workload on your M3 database server, which is the whole point of this exercise, right?
- Next, select which database will get updated via this Subscription… in this case that’s M3TSTRPT (the one we created in Step One).
- Next, set the security access for the connections for both the Subscriber and Distributor processes. Much like the earlier bit, I use a Windows account with admin access, and for the Distributor connection I tell it to impersonate the process account.
- You can schedule how often you want the Subscriber to run. Select “Run continuously” for those near real-time updates from M3.
- Next, do you want to launch this immediately, or just create a script and run it later?
- Also, do you want to actually create the Subscriber now, and/or create a script to use later?
- Click Finish and off you go!
A pop-up will show the progress through the steps of creating the Subscription and starting the Snapshot Agent.
Once this is complete, we have one last change to make. On your reporting server, under Replication/Local Subscriptions, pull up the Properties for your new Subscription. Look for the Snapshot section, which probably reads “Default”. Use the drop-down to change that to Alternate Location, and specify the shared folder in the box immediately below (\\share\folder).
Step 4: Launch the Replication
At this point, if you open up your reporting database you shouldn’t see any File Tables in there yet. So let’s kick off the process!
Go over to your M3 database, browse under Replication/Local Publications, and use a right-click to Reinitialize. That should launch the creation of a new snapshot, and start the replication process running continuously.
Depending on how many tables you are bringing over, and their size, you should begin to see tables populate in your reporting database.
As a quick test I’ll pull up my own user ID record to see how it looks in the reporting database, and then go into M3 and make a change (such as inserting “TEST” at the beginning of my name). Within a few seconds of hitting Enter in M3, I refresh the query on my reporting database and sure enough, the update comes across!
Note: If you don’t see data showing up, check the Job Activity Monitor on both servers to see if the job ran into a problem. Most likely you have an issue with the security access, or perhaps the folder location where the snapshot is being dropped off and picked up.
Next Up: Monitoring Status, Adding Tables, & More
This should be enough to get you started with the process of creating a reporting database in SQL Server for M3. I’ll follow up with more on how we can monitor the status of the replication process, make changes as needed (typically adding more tables), and more.
I highly recommend you try this out first against your test environment to make sure you get all the steps right before implementing against PRD.
Happy Reporting!
Note: If you enjoyed this post and could use some help or assistance with Infor M3 (functional or technical), I am available for part-time after hours consulting. Please send a note through my Contact page or connect with me on LinkedIn for further details!

